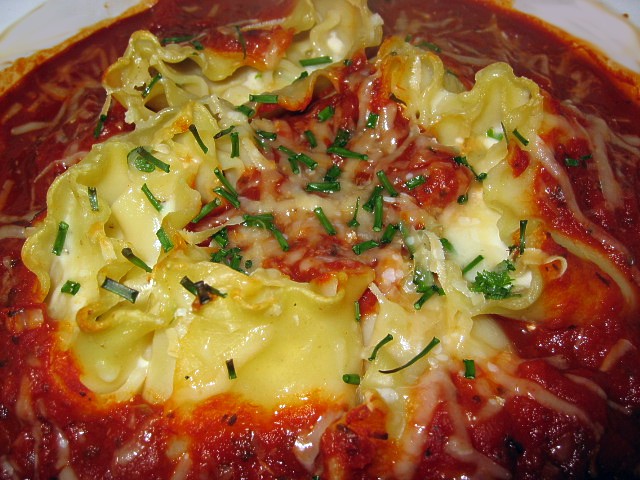
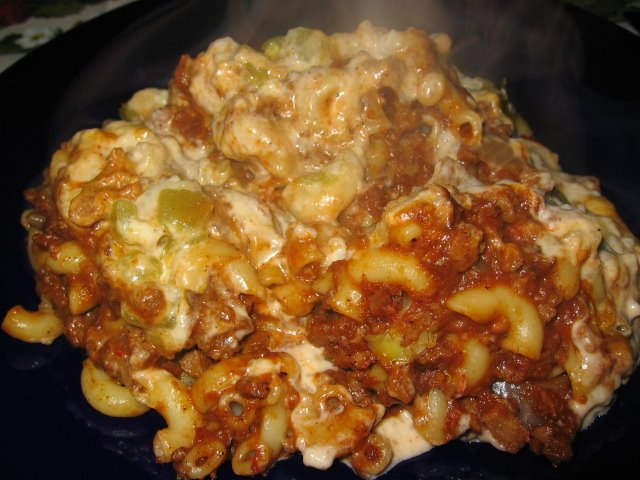
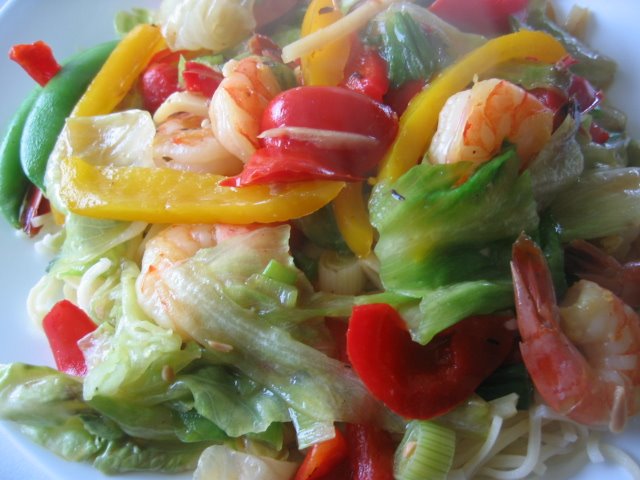
Thursday, April 27, 2006

Pastitsio

The Plain Jane


The Snazzy Stir-fry


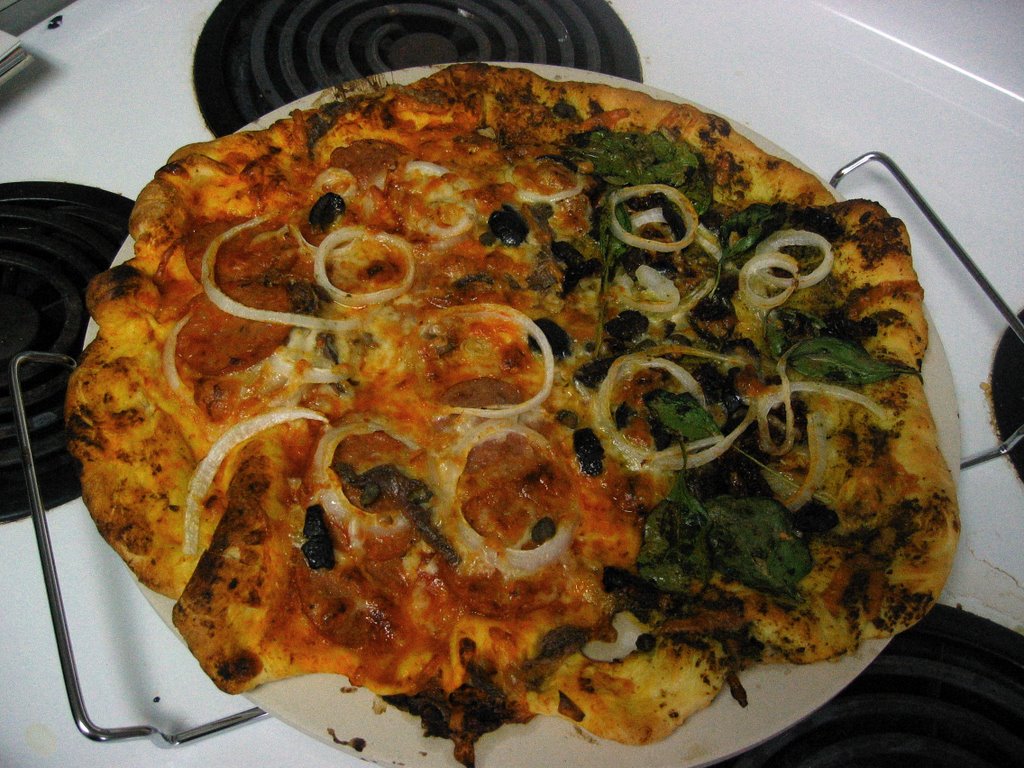
It's ironic that some of the most favoured comfort foods don't photograph well. Perhaps it's the gooey, creamy textures. Maybe it's the well-chopped, well-cooked nature that makes it a dull, plain-Jane next to a snazzy stir-fry or a glittering confection. It could be because we put in it the foods that are meant to dull the senses instead of excite them. But it still needs to be talked about because it's the foods that takes the edge off a nasty day at work or lets us linger in the fond memories of childhood. We run back to these foods because we know they may not excite the eye but they DO excite the nose and taste buds.

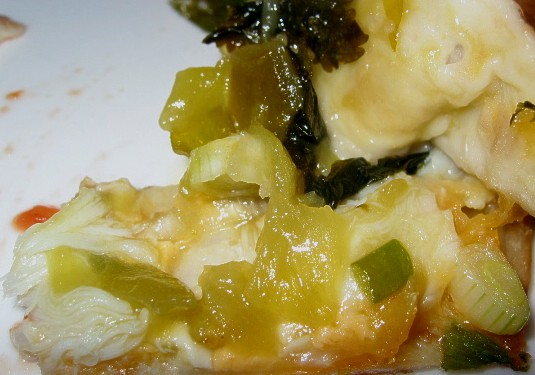
One such dish in my repetoire, inherited from my mother, is Pastitsio. It's a dish I'm sure that many are familiar with in its form if not under the same name. I changed it a long time back because I still desired its undulating, spicy goodness but couldn't handle the greasy meat that made up a good part of it. Instead I used a vegetarian mock ground round made by Yves Veggie Cuisine. It substitutes well so long as salt-free tomato sauce is used. Mockmeat becomes horribly attracted to salt if too much is used and makes the dish unpalateable. And please don't poopoo the use of the sweet spices. They really do make the dish what it is. Even Ben likes it and he has a horror of mixing sweet spices with meat.

PASTITSIO


1/2 pound very lean ground beef (or soy-meat equivalent)
1/2 cup onions, chopped
1 can(8oz) tomato sauce
1/2 tsp salt
1/2 tsp pepper
1/4 tsp cinnamon
1/4 tsp allspice
1/4 tsp nutmeg
8 oz elbow macaroni, cooked
2 tbsp parmesan (grated)
1 1/4 cups milk
2 tbsp flour
3 drops tabasco (or a small can of green chiles as I used when my bottle
disappeared)

Preheat oven to 375 F. Spray 8x8 pan with Pam. Spray skillet. Brown meat and onions in skillet (if you use mock meat, you may want to start the onions a bit earlier) for three minutes or until meat is no longer pink. Pour off and discard excess fat. Add tomato sauce, 1/4 tsp salt, 1/4 tsp pepper, cinnamon, allspice and nutmeg. Mix in hot macaroni and parmesan. Spoon into baking pan.

In the same pan with leftover bits of sauce within it, stir together milk and flour in skillet until very smooth. Lower heat and cook 1 minute or until mixture thickens slightly. Stir in tabasco, remaining salt and pepper. Pour white sauce over the meat and macaroni mixture in pan. Bake in oven 25 minutes.

NB: I didn't have tabasco but did have some green canned chiles so I put them on the white sauce. They added a nice contrast and the buzz that tabasco brings. I use a glass casserole and found no need for spraying necessary to keep it from sticking. In using mock meat you also rarely need spray for the pan if you have a good teflon pan to cook it in. I made sure to add the bit about keeping the pan dirty for the white sauce as this was never in the original recipe but just an understanding passed from mother to daughter. Plus it saves time ;-)

Wednesday, April 26, 2006

Crab Quesadillas

I love food stuffed in a doughy product. I love samosas, burritos, perogies, calzones, spanakopita... and I love quesadillas too! Last week, when I was going through a "cooking like crazy" phase one day I found and made these great, most repeatable treats--crab quesadillas. They were quite stuffing and could have satisfied me for dinner alone (if I hadn't so crazily created Mexican fried chicken and Potatoes con Queso too). I like how the crab paired off with the cheese (I had to add the pepper in the pepper jack. Not in MY store these days). The chilies I had were a bit too mild for my taste but not that bad. Of all the things I'd made that day, this was really quick. I think I was done in twelve minutes.

I don't really have the most ideal of pictures to show but it will give an idea of the inside and outside.


Go here for the recipe. I found I really like this new recipe site: "That's My Home". Lots of great ideas including this post's dish.

Monday, April 24, 2006

Chicken Meatball Curry


I have no idea where I got this recipe from bookwise. I found it when clearing out some papers this weekend and I remember I copied at my mom's house from some book. I just don't remember if it was a library book or from her own shelf of recipe books. Whatever the case may be, it's a keeper. A BIG time keeper. Despite its being a bit long in the making (for me) since I had to microwave-defrost and debone each thigh, it is a very straightforward. I had to replace one or two products, too, but it didn't seem to effect the flavour at all.

I figured it would be edible and maybe even good but I was stunned at just how good it was! It's not the prettiest looking dish on the block but its flavour makes up for it immensely.


Chicken Meatball Curry


2 lbs chicken meat (I used thighs--it's all I had)

2 tbsp chopped onion (actually I probably had more like 3 tbsp in mine)

1/4 cup bread crumbs

1 egg

1/2 tsp cayenne, turmeric, ginger powder, black pepper, dried basil, dried thyme
each leaves, dried oregano, paprika (I made each one a heaping 1/2 tsp)

1 tsp salt

1 minced garlic clove

3 tbsp safflower oil

2 tbsp butter

2 tbsp all-purpose flour

1 tsp curry powder (heaping for me)

1 1/2 cup Chicken stock (replaced it with Veggie stock)

3/4 cup light cream (had to use heavy cream as it's all I had)


In a food processor coarse chop the chicken. Add onions, bread crumbs, egg, seasoning, and garlic. Process into a fine mix (not too much or it gets sticky). Remove and shape into small balls (works for larger walnut-sized ones like I did too)

Heat oil in large skillet and brown the meatballs. Drain all the oil (I did it in batches and put them on paper towel). Transfer meatballs to a casserole dish.

Heat butter in a sauce pan. Add the flour and curry powder. Stir and cook for 2 minutes over low heat. Add stock and cream. Simmer for 5 minutes. Pour sauce over meatballs in casserole dish. Cover casserole and bake in preheated oven (350 F) for 45 minutes. Serve with rice.

Thursday, April 20, 2006

Samosa Satisfaction At Last


I love samosas. Who wouldn't? Spicy veggies or meats pocketed in a little pillow of dough and deep fried. Ask me if I want a samosa and I will gladly say yes. Ask me to make my own and I would get shivers and balk at the thought, turning and running like the wind. No matter how hard I tried, I could never ever ever ever get the dough right for the pockets. I thought I'd never have the pleasure of samosa heaven. Then I found out about pre-cut samosa wrappers. I bought about three packages on my last sojourn south. Wanna know what happened when I tried them out for the first time? I happy-danced all over the kitchen when I sealed up my first little pillow of samosa filling in that little pocket. It was like I had reached samosa enlightenment. I near-danced and sang my way through the rest of the pocket-forming and -filling. "Samusa Wrappers" You SAVED MY SANITY!

I made two kinds of samosas. One kind for me. One kind for Ben. For eons I haven't been able to tolerate ground beef without getting ill but Ben loves it. So mine enjoyed a spicy potato filling that suited me just fine.

Meat Samosa Filling (adapted from The Complete Indian Cookbook by Mridula Baljekar):

2tbsp cooking oil
2 medium-sized onions, finely chopped
8 oz lean ground lamb or beef (I used beef. Where would I find ground lamb here?)
3-4 cloves garlic, peeled and crushed
1/2inch cube ginger, finely grated
1/2 tsp ground turmeric
2 tsp ground coriander
1 1/2 tsps ground cumin
1 tsp chili powder
1/2 tsp salt or to taste
1/2 cup warm water
1 cup frozen peas
2 tbsp flaked coconut
1 tsp garam masala
1-2 fresh green chile peppers, finely chopped, seeded for a milder flavour
2 tbsp chopped coriander leaves (Ben isn't so fond so I cut it down to a smidgen)
1 tbsp lemon juice
[NB: There was a tad more meat than asked for and I know Ben likes spices so I doubled up on all spices]

1. Heat the oil over medium heat and fry the onions until they are lightly browned
2. Add the meat, garlic and ginger. Stir and fry until all the liquid evaporates and adjust heat to low.
3. Add the turmeric, coriander, cumin, chili powder, and salt. Stir and fry until meat is lightly browned.
4. Add the water and the peas, bring to a boil, cover and simmer for 25-30 minutes. If there is any liquid left, take the lid off and cook over medium heat until the mixture is completely dry, stirring frequently.
5. Stir in the coconut, garam masala, green chili peppers and coriander leaves.
6. Remove from heat and add the lemon juice. Cool thoroughly before filling the pastry.

Vegetable Samosa Filling (adapted from The Complete Indian Cookbook by Mridula Baljekar):

3 medium-sized potatoes
2 tbsp cooking oil
1/2 tsp black or white mustard seeds
1 tsp cumin seeds
2 dried red chili peppers, coarsely chopped (I suppose you could seed them. I didn't)
1 medium-sized onion, finely chopped (I like onion. I used a large onion)
1-2 fresh green chiles, coarsely chopped and seeded for milder flavour if desired
1/2 tsp turmeric
1 tsp ground coriander
1 tsp ground cumin
1 tsp salt or to taste
1 tbsp chopped coriander leaves (Don't have much so did what I could)

[NB: like with Ben, I like spices so I double up on the spice amounts. Also added some lemon juice like Ben's by accident but actually adds a nice zing]

1. Boil the potatoes in their skins, allow them to cool thoroughly, then peel and dice them
2. Heat the oil and add mustard seeds. As soon as they start crackling, add the cumin seeds and red chili peppers. Stir. Add the onions and green chili peppers. Fry until the onions are soft. Add the turmeric, coriander and cumin.
3. Stir quickly and add the potoatoes and the salt.
4. Reduce heat to low, stir and cook until the potatoes are thoroughly mixed with spices
5. Remove from heat and stir in coriander leaves. Cool thoroughly before filling the samosas.


Last steps for both:
A) Follow samosa wrapper instructions for folding and filling. Complete the pockets before doing next step.
B) Fill frying pan with oil up to 1/2 inch. Heat. When hot drop in samosas about four or five at a time. Fry on one side until golden brown, flip and fry other side. Remove from pan and drain on paper towels.

You'd need two packages of "Samusa Wrappers" for this or you will have leftovers like I did. Well.. of the meat. Ben took the potatoes as a side dish.

We also had it with my favourite Indian food accompaniment: Coconut Rice (recipe at a later time)

Wednesday, April 12, 2006

Trout with Lemon and Capers


Even though the grey days are trying to continue the feel of winter, little jolts of spring are everywhere. From the evening "cheery-up" of robins, the splash of magenta salmonberry flowers, the clouds of seagulls feasting on herring to the mini-vw sound of the hummingbirds in hot pursuit of rivals, the blahs of the colder months are being shooed out of Waglisla. Even some foods can chase away those winter blues. Rainbow trout is just such a contender. I've rarely had trout but when I did, it was always in summer. So, psychologically, I tag warm weather to the taste of these little beauties.

Now the problem was that I had never actually cooked trout myself. I always got it from others and it was always cooked. So, what to do? I found a very simple recipe that lends itself well to such a tasty fish at cdkitchen.com which involved very little work and needed little in the way of ingredients I didn't already have. THAT, of late, is a big bonus. Our shelves have been a bit more empty these days since our major source of food delivery, the ferry "Queen of the North", sank some weeks ago.

The recipe is basically one of flouring and frying the fish. After playing with their jaws to make my own ventriloquist act for Ben, I did just that. Served with a butter-caper sauce, boiled potatoes and salad, it was a nice, bright tasting pick-me-up. So, without further ado: Trout with Lemon and Capers

Monday, April 10, 2006

That's Amore!


Pssssst... don't tell the Frog but I'm madly in love. I'm having a love affair with my new pizza stone. My whole world has deep and passionate flavour now. I don't know what I did without his sleek lines and hard, hot body...

But seriously, I really do love my new pizza stone. It has really changed the way I see homemade pizza. Depending on how your oven is behaving, getting great pizza crust is a crapshoot at best (read: average ordinary oven which technically isn't YOUR oven because it's in an apartment. You get what you can).

A few days back I meant to have a post about my new pizza stone and its wonders but my dough sat in the bowl like a lead weight. We sat there, the dough and I, staring at each other. And that's about it. No rising, no lovely yeasty smell. NOTHING. I was miserable. Ben was miserable. It was too late to make a new batch after all that waiting. There was silence and pouting until I whipped some Indian food under Ben's nose. Honestly, I don't know what he'd do without me *wink, wink*

With renewed determination I whipped up some more dough yesterday. I watched over it like a frenetic mother. I started to panic after a while when I saw no activity but with a quick change of location the action began. After a while I whipped off the saranwrap and was hit by a lovely yeasty scent. HURRAH! With hope and determination I'd already put in the stone and it was heating up beautifully.

But don't think that was the end of my trials. It wouldn't be my life if it had all ended there so easily. There were stupid slip ups of touching the metal carrying rack with a finger tip (swearing occured here). There was whipping the dough into a decent pizza shape (cursing involved here). There was the realization that I couldn't carry the decorated pizza to the stone because I didn't have it on anything that would allow pick up (enter explicatives here). And there there was the actual carrying that involved topping mixups (much fuming here). But when that dough hit the scalding hot stone the whole apartment filled with the seductive smells of pizza dough, tomato sauce, cheese... All was forgiven.

Like a mother giving birth, I didn't remember the pain I went through. I only saw the beauty of my baby. And my baby tasted good too. Crust was a bit overcooked and I know to add more toppings next time but I felt like I was tasting a real pizza for the first time in I don't know how long. And I made it. Now there are so many toppings to try... lardons... potatoes... cream... *fade away*

Thursday, April 06, 2006

Revisiting Tuna Casserole


The Camera Issue... still

Ben: What do you think?
Me: (distractedly) Of what?
Ben: Of dinner. This is SO good. Haven't you tasted it yet?
Me: No. I haven't had a bite of it yet.
Ben: (in an annoyed voice) Well if you'd put down your camera for a second you might actually find out what your creations taste like.

Hallmarks of My Childhood #2

I've been keening for a bit of childhood comfort food for a while. My crazy life the last couple of weeks made me too tired to concentrate on "Me Food" but I craved it nonetheless. Now that I can breathe again I will be revisiting some childhood favourites (Hmm... anything to do with birthday issues perhaps?). First on my agenda is Tuna Casserole. With a bit of tweaking I made it my own but still kept the basics.


Tuna Casserole Revampoli

1 cup uncooked pasta (I prefer shells)
1 tbsp butter
2/3 cup onion, diced
2/3 cup zucchini, sliced and quartered
1 can cream of celery soup
1/2 cup light cream
1 cup canned tuna, flaked and drained
1/2 cup defrosted peas
1/2 tsp salt
1/2 tsp freshly ground pepper
1/2 cup grated smoked cheddar

Cook noodles. Drain. Meanwhile, melt butter in skillet on medium low heat. Add onions and stir for one to two minutes. Add zucchini slices. Cook until zucchini translucent and onions are starting to brown. Add soup, milk, flaked tuna, peas, salt and pepper. Stir to mix well. Add cooked noodles. Stir in. Pour mixture into a greased baking dish. Sprinkle cheddar over top. Bake for 25 minutes at 350.

Tuesday, April 04, 2006

Successes and Failures

In my pursuit of showing off the birthday sushi dishes (look at the pretty swirly designs on the close up of the sauce below) I mentioned in my previous post, I tried my hand at two recipes. One was a disaster only in adeptness of fingers because it tasted so good. But the other was a disaster because, in my opinion, it was a waste of precious sushi rice even if it made for a pretty and colourful picture.

The first recipe was my adaptation of an Emeril recipe for Spring Rolls with Peanut Sauce. I read the list of ingredients for what I did have and I looked at the basic way to throw it together. That's about it. Here's what I created (and Ben loved):


Nerissa's Spring Rolls

1 shallot, finely chopped
2 cloves garlic, finely chopped
1 1/2 Tbsp Vietnamese fish sauce
1/2 Tbsp sugar
1/4 tsp freshly ground black pepper
1 Tbsp peanut oil
12 - 16 boiled shrimp
1 1/2 cups cooked rice vermicelli
1/4 cup thinly sliced cucumbers
1/4 cup shredded carrot
1 cup thinly shredded romaine lettuce
4 rice paper wrapper (discs)

Mix together the first six ingredients. In a pan, over medium-low heat, simmer the prawns in mixture. Turn every few minutes for even flavouring. Remove from heat after about 10 minutes and allow to cool 5 minutes.

Assemble the rolls 1 at a time: Dip 1 spring roll wrapper in a large bowl of lukewarm water and quickly transfer to a clean kitchen towel (Wrapper softens in seconds). Lay three or four shrimp in a horizontal line across the lower third of the rice wrapper. Top with a 1/4 cup of well-drained cooked rice vermicelli. Top the vermicelli with slices of cucumber and shredded carrot. Place 2 tablespoons of shredded romaine on top of cucumbers. Carefully pull the lower edge of the wrapper up and over the filling. Fold the two sides inward over the filling. Work carefully to not tear the wrapper. Once both sides are folded inward over the filling, roll the spring roll upward wo the filling is tightly contained and roll up to seal. Set aside roll on a plate and repeat with other wrappers. You could serve them immediately or chilled with Peanut Sauce on the side for dipping.


Peanut sauce:

1/2 tbsp peanut oil
2 garlic cloves, minced
1 tsp chili paste
1/2 tablespoon ketchup
1/4 cup plus 2 tbsp chicken stock (or water)
1/4 tsp sugar
1 tbsp peanut butter
3 tbsp hoisin sauce
Chile oil (optional) to taste

Mix all ingredients, blending very well. Serve with spring rolls.

~
There were a lot of things I didn't include from the original because I didn't have it on hand but it still tasted good. Other ingredients that were listed were Thai basil, mint, marinated pork... etc. But honestly if you want a good, straight-foward meal for a fussy eater, my version may do the trick.

My first attempt at using rice paper wrappers was pathetic at best. My fingers fumbled their way through four in more time than I'd like to admit. My BIG piece of advice: Work FAST! Slowness make the fumbles worse because the paper becomes even more floppy.


The Disaster of the night:


I tried making something called Country Style Sushi Salad which is basically cooked sushi rice with sushi-like ingredients mixed in. It turned into an unappealing mixture of flavours. Enjoy the picture but don't ask for the recipe. Please, for the sake of humanity, don't!

Monday, April 03, 2006

Lasagna Rollups


A week and a half ago Michelle of Accidental Scientist wrote about making lasagna roll-ups. Now I haven't gotten around to trying her version but I did mention that my family had our own version of this recipe. We had it tonight and I'd like to share it with you. It's pretty easy and straight forward. Just don't do it unless you have family that is willing to wait patiently for 45 minutes while the baked dish sends out come-hither wafts of Italian tomato sauce and cheese.

Lasagna Rollups: Hallmarks of my Childhood #1

18 lasagna noodles
3 cups cottage cheese
2 cups mozarella cheese, grated
1/2 cup parmesan cheese, grated
1 Tbsp parsley, well-chopped
2 eggs, beaten
dash nutmeg
1/2 tsp salt
dash pepper
28 oz spaghetti sauce
1/4 cup parmesan


Cook lasagna noodles. Combine filling ingredients except spaghetti sauce and 1/4 cup parmesan cheese. Put a cup of spaghetti sauce on bottom of 13 x 9 pan. Place a generous 1/4 cup of filling at the end of cooked noodle and carefully roll up. Place stuffed noodles in pan in rows. Pour the rest of the sauce over the stuffed noodles. Ensure good coverage of all stuffed noodles by spreading with a spatula. Sprinkle over top with the 1/4 cup of parmesan cheese. Bake at 350 for 45 minutes.

Serves 6 - 9 people


This really is a base recipe as you can play around with quantities all you want. I added some chives to the mix. It was okay but a bit overpowering with the delicacy of today's cheeses of choice. I usually use a jarred spaghetti sauce. What you choose really creates the final flavours. My personal favourite is herbs and wine spaghetti sauce. My mother usually uses the shakeable parmesan but I grated my own. Depends on the quickness you want as either taste fine.


With a nice side salad, this can really fill you up fast. Expect leftovers unless you have a large family or a good helping of hungry guests.